
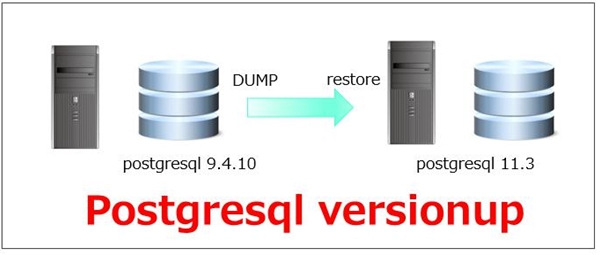
ここでは、現在、稼働しているpostgresql version 9.4.10 からデーターをdump(出力)し、別サーバーにインストールされているpostgresql 11.3 へそのデーターを移行(restore)するヴァージョンアップ方法と、postgresqlのインストール方法を詳しくご紹介致します。
各OS/Middlewareのヴァージョンは以下のとおりです。
| OS/Middleware | Version |
| CentOS | 7.6.1810 (x86 64bit) |
| 旧postgresql | 9.4.10 |
| 新postgresql | 11.3 |
| php | 7.3.5 |
| apach | 2.4.6 |
また、サーバーのIPアドレスとポート情報は以下のとおりとなります(仮)。
| IPアドレス | port番号 | |
| webサーバー | 192.168.1.1 | 8080 |
| postgresql 9.4.10 が稼働している旧DBサーバー(移行元) | 192.168.2.1 | 5432 |
| postgresql 11.3 が稼働している新DBサーバー(移行先) | 192.168.3.1 | 5432 |
Contents
事前確認作業
1-1. centOSのヴァージョン確認、および存在確認
(例)CentOS Linux release 7.6.1810 (Core) などの情報を確認することができます。
1-2. phpのヴァージョン確認、および存在確認
#rpm -qa | grep php
※何も表示されない場合は未インストール。
1-3. apacheのヴァージョン確認、および存在確認
#rpm -qa | grep httpd
※何も表示されない場合は未インストール。
1-4. postgresqlのヴァージョン確認、および存在確認
※何も表示されない場合は未インストール。
1-5. proxyを利用している場合は、yum.confの設定を行う。
ファイル名:/etc/yum.conf
proxy=http://192.168.1.254:8080 ←proxyのIPアドレスとポート番号を設定
proxy_username=ユーザーID ←(例)linux@domain-name
proxy_password=ユーザーパスワード
これで事前確認は終了です。これから先がinstallationとなります。
PHP installation & network tools installation
2-1. network系コマンドパッケージのインストール
#yum install net-tools
installが完了すると「完了しました!」が表示されます。その後、ifconfigコマンドが使用できるか確認をしましょう。
net-toolsパッケージをinstallすることで、ipconfig、route、arp、netstatコマンドが使えるようになります。ただし、これらのコマンドは将来廃止予定です。
2-2. wgetのインストール
#yum install wget
installが完了すると「完了しました!」が表示されます。
2-3. EPELリポジトリのインストール
#yum install epel-release
installが完了すると「完了しました!」が表示されます。
※EPELとはExtra Packages for Enterprise Linuxの略で、Fedoraの有志が作成、メンテナンスしているRed Hat Enterprise LinuxやCentOSでも使えるパッケージレポジトリのことです。
2-4. Remiリポジトリ
#yum install http://rpms.famillecollet.com/enterprise/remi-release-7.rpm
CentOS7は「remi-release-7.rpm」をインストールします。
installが完了すると「完了しました!」が表示されます。
(注)EPELのリポジトリの追加を行った後に Remi のリポジトリを追加すること!
remiは、有志で最新バージョンのPHPモジュールをRHEL系のディストリビューションに提供しています。
2-5. PHP のパッケージ情報を確認
#yum info php –enablerepo=remi-php73
以下のようなphpパッケージ情報が表示されます。inatallはまだされていません。
利用可能なパッケージ
—————————–
名前 : php
アーキテクチャー : x86_64
バージョン : 7.3.5
リリース : 1.el7.remi
容量 : 3.2 M
リポジトリー : remi-php73
2-6. PHPのインストール
#yum install php –enablerepo=remi-php73
installが完了すると「完了しました!」が表示されます。
2-7. PHPインストールの確認
#php -v
#rpm -qa | grep php
下記のメッセージを確認しておきましょう。
PHP 7.3.5 (cli) (built: Apr 30 2019 08:37:17) ( NTS )
2-8. PHP拡張アプリケーションをインストール
#yum install –enablerepo=remi-php73 php-xml php-gd php-mysql
#yum install –enablerepo=remi-php73 php-opcache
#yum install –enablerepo=remi-php73 php-mbstring
「完了しました!」を確認し、エラーメッセージが出ていないことを確認しましょう。
apache installation
3-1. apache のパッケージ情報を確認
#yum info httpd
以下の情報を確認しましょう。
—————————–
インストール済みパッケージ
名前 : httpd
アーキテクチャー : x86_64
バージョン : 2.4.6
リリース : 89.el7.centos
容量 : 9.4 M
リポジトリー : installed”
3-2. apache のインストール
#yum -y install httpd
apacheをインストールします。
3-3. apache の稼働状況を確認
#systemctl status httpd.service
apacheの稼働状況を確認します。
3-4. apache を稼働させる
#systemctl start httpd.service
3-5. htapache pdの稼働状況を確認
#systemctl status httpd.service
#ps -e | grep httpd
Active: active (running) になっていることを確認する。また、psコマンドで稼働状況を確認します。
3-6. apache の自動起動設定
#systemctl enable httpd.service
3-7. httpdの自動起動設定の確認
#systemctl list-unit-files -t service | grep httpd
httpd.service がenabledになっていることを確認します。
3-8. ポートのフィルターを確認
#firewall-cmd –list-all –permanent
httpプロトコルであるport80が追加されていることを確認、port#80がない場合はポート追加を行います。ポートがフィルターされているとhttpアクセスができません。
3-9. port#80、port#5432をポートのフィルターから除外する
#firewall-cmd –add-port=80/tcp –permanent
#firewall-cmd –add-port=5432/tcp –permanent
successを確認します。port#5432はpostgresqlのデフォルトのport番号です。サーバーのpostgresqlへのアクセスはport#5432で接続されます。
3-10. httpd.confの設定
#cd /etc/httpd.conf
#cp -pi httpd.conf httpd.conf_org
#diff httpd.conf httpd.conf_org
#vi httpd.conf
#vi httpd.conf
1)Listenポートの設定
Listen 192.168.1.1:8080
2)SSI・CGI・シンボリックリンクの許可設定
<Directory “/var/www/html”>
Options Includes ExecCGI FollowSymLinks
AllowOverride All
</Directory>
3)cgiの拡張子を設定
<IfModule mime_module>
AddHandler cgi-script .cgi .pl
</IfModule>
4)文字化け対策
AddDefaultCharsetディレクティブコメントアウト
#AddDefaultCharset UTF-8
3-11. .htaccessの追加
192.168.1.1へアクセスされた時、301コードで返答し、192.168.1.1配下のサブディレクトリであるdrupalへリダイレクトをする。
ドキュメントルートである/var/www/html/配下に ”.htaccess”ファイルを作成し配置する。
#vi .htaccess
<IfModule mod_rewrite.c>
RewriteEngine on
RewriteRule ^(.*)$ http://192.168.1.1/drupal/ [R=301]
</IfModule>
postgresql installation
4-1. postgresのlatest versionの確認
https://www.postgresql.org/support/versioning/
4-2. postgresの最新のレポジトリーの確認
https://yum.postgresql.org/repopackages.php#pg11
4-3. postgresqlのリポジトリをdownload
ファイル名:pgdg-redhat-repo-latest.noarch.rpm
4-4. リポジトリーをインストール
#rpm -ivh pgdg-redhat-repo-latest.noarch.rpm
インストール中、および100%を確認しましょう。
4-5. postgresql version 11のインストール
#yum -y install postgresql11-server
installが完了すると「完了しました!」が表示されます。
4-6. postgresqlに関連する他のパッケージもinstall
#yum -y install postgresql11-libs postgresql11 postgresql11-contrib postgresql11-devel
※postgresql-develは開発モジュール
※postgresql-contribはpostgressqlが提供する追加モジュール
※postgresql11はクライアントプログラム
4-7. インストールされたことを確認
#rpm -qa | grep postgres
以下のようなメッセージが表示されることを確認します。
postgresql11-11.3-1PGDG.rhel7.x86_64
postgresql11-contrib-11.3-1PGDG.rhel7.x86_64
postgresql11-libs-11.3-1PGDG.rhel7.x86_64
postgresql11-server-11.3-1PGDG.rhel7.x86_64
postgresql11-devel-11.3-1PGDG.rhel7.x86_64″
4-8. 状態を確認する
#systemctl status postgresql-11.service
4-9. postgresql version確認
#psql –version
psql (PostgreSQL) 11.3であることを確認する
4-10. postgresqlのアカウント(ID)が作成されたことを確認する
#view /etc/paswd
4-11. databaseの初期化
#cd /var/lib/pgsql/data
#PGSETUP_INITDB_OPTIONS=”-E UTF8 –locale=C” /usr/pgsql-11/bin/postgresql-11-setup initdb
※エンコーディング UTF8、ロケールなし(locale=C)を指定
Initializing database … OK を確認すること!
4-12. postgresql-11の起動
#systemctl start postgresql-11.service
以下のメッセージを確認します。
Created symlink from /etc/systemd/system/multi-user.target.wants/postgresql-11.service to /usr/lib/systemd/system/postgresql-11.service.
4-13. start-upをenableにする
#systemctl enable postgresql-11.service
4-14. 環境変数の変更
#su – postgres
$ vi ~/.pgsql_profile に以下を追加
~~~~~~~~~ 追加内容 ~~~~~~~~~
PATH=/usr/pgsql-11/bin:$PATH
MANPATH=/usr/pgsql-11/share/man:$MANPATH
export PATH MANPATH PGDATA ←1番最後の行に追加
4-15. 環境変数の再読み込み
#. ~/.bash_profile
4-16. 環境変数が変更されたことを確認する
#env
4-17. postgresqlの起動
#systemctl start postgresql-11.service
4-18. postgresqlの状態確認
#systemctl status postgresql-11.service
4-19. postgresqlにconnectを行う
#su – postgres
psql -l でDBが表示されることを確認しましょう。
Postgres version-up作業
5-1. postgresqlのdump(旧postgresqlサーバーで作業)
#cd /var/tmp
#pg_dump redmine -c > redmine_backup.dump -U redmine -h localhost
/var/tmp配下に「redmine_backup.dump」ファイルができます。
[コマンドの意味]
pg_dump dumpするDB名 -C > 出力ファイル名 -U ユーザー名 -h ホストアドレス
※rootで上記コマンドを実行すること!
※postgres(DB)にログインしない! コマンドプロンプトから上記コマンドを投入。
※argument “-c” はdump前にDBをclean upする。
5-2. ユーザー確認と作成(新postgresqlサーバーで作業)
#psql -U postgres ← 新postgresqlサーバーにpostgresユーザーでログイン
postgres=# ← 新postgresqlへログイン完了。プロンプトが表示される。
postgres=#CREATE ROLE redmine WITH LOGIN PASSWORD ‘hogehoge’;
[コマンドの意味]
postgres=#CREATE ROLE ユーザー名 WITH LOGIN PASSWORD ‘パスワード’;
postgres=#\du ← 作成したユーザーが表示されることを確認する
5-3. postgresqlのrestore(新postgresqlサーバーで作業)
#psql -U postgres ← 新postgresqlサーバーにpostgresユーザーでログイン
新DBの作成↓
postgres=#CREATE DATABASE redmDB WITH ENCODING=’UTF8′ OWNER=redmine;
postgres=#\l ←redmine のDBが作成できたか確認をする。
postgres=#\q ←postgresqlから一旦exitする
#su – postgres ←postgreでログイン
postgres$cd /var/tmp ←旧DBサーバーからdumpしたデーターが保存
postgres$psql -d redmDB < redmine_backup.dump ←dumpデーターをrestore
postgres$psql -l -d redmDB -U redmine -h localhost ←postgresにログイン
postgres=#¥dt ←テーブル数とOWNERがredmineであることを確認
[コマンドの意味]
postgres=#CREATE DATABASE DB名 WITH ENCODING=’UTF8′ OWNER=ユーザー名;
dumpしたデーターをrestore↓
postgres$psql -d DB名 < dump出力されたファイル名
※postgresユーザーでコマンドプロンプトから実行すること
postgres$psql -l -d DB名 -U ユーザー名 -h ホストアドレス
#psql -U postgres
postgres=#ALTER DATABASE redmDB OWNER TO redmine;
[コマンドの意味]
postgres=#ALTER DATABASE DB名 OWNER TO ユーザー名;
5-4. DB接続設定(redmineアクセス設定)
webサーバーなどpostgresqlサーバーとは別のサーバーからアクセスしたり、また、ローカルホストからアクセスするための設定。
#cp -pi database.yml database.yml_org ← オリジナルファイルのbackup
#vi /var/lib/redmine/config/database.yml ← アクセスに応じた設定変更
※redmineの設定ファイル「database.yml」は、redmineがインストールされた接続元のサーバーにある。
~~~~~~~~~ 変更内容 ~~~~~~~~~
production:
adapter: postgresql
database: redmine
host: localhost → 新postgresqlサーバーのipアドレスに変更
username: redmine
password: 決めたもの
encoding: utf8
#psql -U postgre ← パスワードを変更したいユーザーでDBにログイン
postgres=#Alter Role postgres with password ‘パスワード’;
5-5. pg_hba.confでログイン認証を設定変更をする(新postgresqlサーバーで作業)
~~~~~~~~~ 変更内容 ~~~~~~~~~
下の4行をコメントアウトする
#local all all peer
#local replication all peer
#host replication all 127.0.0.1/32 ident
#host replication all ::1/128 ident
以下の5行を追加する
host redmine redmine 127.0.0.1/32 md5
host redmine redmine ::1/128 md5
host redmine redmine localhost md5
host redmine redmine 192.168.3.1/32 md5 ← 新DBのIPアドレス
host redmine redmine 192.168.1.1/32 md5 ← 接続元のIPアドレス
md5でpostgresへのログインがrequestされる、「trsut」を設定すると、パスワード無しでpostgresにログインできる。
5-6. postgresql設定(新postgresqlサーバーで作業)
#cd /var/lib/pgsql/11/data/
#cp -pi postgresql.conf postgresql.conf_org
#vi /var/lib/pgsql/11/data/postgresql.conf
~~~~~~~~~ 変更内容 ~~~~~~~~~
listen_addresses = ‘*’ ← どのホストからも接続可
port = 5432 ← コメントアウトを外し、postgresqlのport#5432を設定
logging setting
6-1. postgresql logging設定
ログの設定ファイル /var/lib/pgsql/11/data/postgresql.conf
~~~~~~~~~ 追加内容 ~~~~~~~~~
ログファイ名:log_filename = ‘postgresql-%a.log’ (デフォルト)
ローテーション:log_rotation_age = 1d (デフォルト)
ディレクリー:log_directory = ‘log’(デフォルト)
出力先:log_destination = ‘stderr’
保存有効化:logging_collector = on
クライント送信ログレベル:lient_min_messages = notice
サーバーに書き込むレベル:log_min_messages = warning
エラー原因のSQLを書き込むレベル:log_min_error_statement = error
router、スイッチの設定方法についてはこちらをご覧ください。